High pressure fuel pump and fuel rail fuel pressure sensor — removal and installation
Warning: The fuel delivery system is made up of a low-pressure system and a high-pressure system. Once the pressure on the low-pressure side of the system has been relieved, wait at least two hours before loosening any fuel fine fittings in the engine compartment.
1. Remove the engine covers.
2. Relieve the fuel system pressure (see Fuel pressure relief procedure).
3. Disconnect the cable from the negative battery terminal (see Engine electrical systems).
4. Remove the intake manifold (see V6 engine or 2B) and the fuel pump/fuel rail insulator (see Fuel rail and injectors — removal and installation).
Fuel rail fuel pressure sensor
Note: The fuel rail fuel pressure sensor is located at the rear of the left-side fuel rail.
5. Disconnect the fuel pressure sensor electrical connector (see illustration).
10.5 Fuel rail pressure sensor electrical connector

6. Unscrew and remove the sensor from the end of the fuel rail.
Caution: The manufacturer states that the sensor must be replaced if it has been removed.
7. Clean the threads in the fuel rail of any gasoline. Place a single drop of oil on the new sensor threads, then install the sensor and hand tighten.
8. Remove the sensor, place another drop of clean engine oil on the threads, then reinstall the sensor and tighten it to the torque listed in this Chapter’s Specifications.
9. Connect the sensor electrical connector.
10. The remainder of installation is reverse of removal.
High-pressure fuel pump
11. Remove the low-pressure fuel feed line bracket bolt and disconnect the feed line at the pump.
12. Using a flare-nut wrench, unscrew the high-pressure line fittings between the fuel rail and fuel pump and discard the pipe as a new one must be used (see illustration).
10.12 Disconnect the feed line (A) and the high-pressure line (B) from the fuel pump (C)

Caution: The manufacturer states that the pipe must be replaced whenever it has been removed.
13. Disconnect the electrical connector from the high-pressure fuel pump.
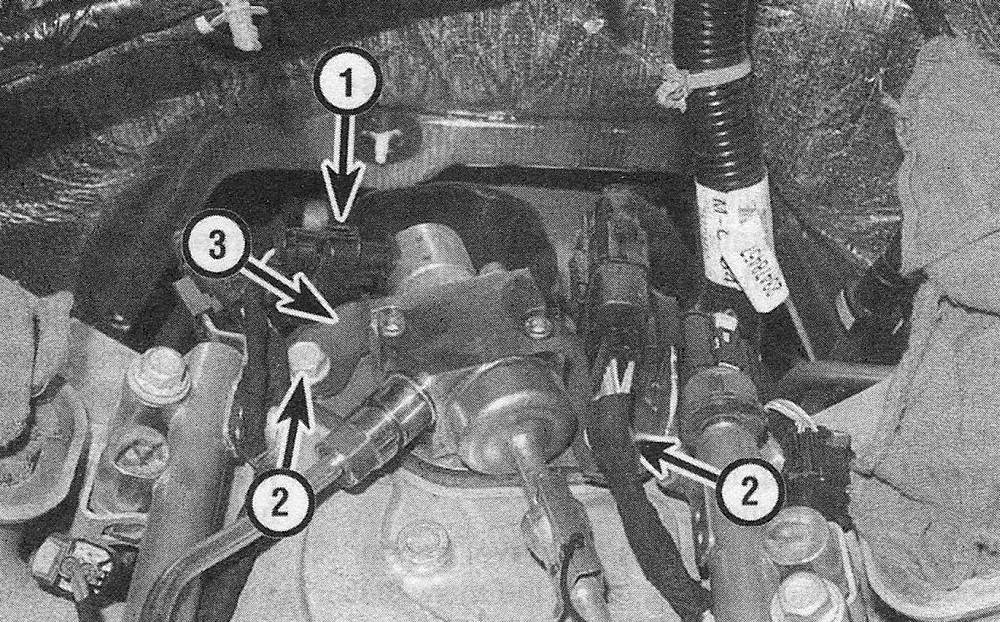
14. Remove the high-pressure fuel pump bolts (see illustration), then remove the cover, pump and gasket. Always replace the bolts and pump gasket with new ones.
10.14 High-pressure fuel pump mounting details
1 Electrical connector
2 Mounting bolts
3 Pump cover

Caution: Unscrew the bolts one turn at a time, alternating between the two of them. If this is not done, the pump plunger will be damaged.
15. With the pump removed, rotate the engine by hand and make sure the camshaft lobe is at its base circle (lowest point) before trying to install the pump.
16. Lubricate the pump roller with engine oil.
17. Using a NEW gasket, set the pump and cover into position on the valley cover and tighten the bolts evenly, one turn at a time, side-to-side.
Caution: Alternately hand-tighten the fuel pump bolts one turn at a time until the pump is fully seated. Attempting to tighten down the pump unevenly may result in pump plunger damage. As the pump bolts are tightened, it will get harder to tighten the bolts until the spring in the pump is compressed.
18. Tighten the bolts to the torque listed in this Chapter’s Specifications.
19. The remainder of installation is the reverse of removal. Clean the high-pressure fuel line fittings on the pump and crossover pipe, then apply a drop of clean engine oil to the threads of each fitting. Install the NEW high-pressure fuel line, tightening the fittings to the torque listed in this. Chapter’s Specifications.
20. The remainder of installation is the reverse of the removal procedure.
21. Reconnect the cable to the negative battery terminal (see Engine electrical systems), then start the engine and check for fuel leaks.