Power brake booster — check, removal and installation
Check
Vacuum booster
Operating check
1. Depress the pedal and start the engine. If the pedal goes down slightly, operation is normal.
2. Depress the brake pedal several times with the engine running and make sure that there is no change in the pedal reserve distance.
Airtightness check
3. Start the engine and turn it off after one or two minutes. Depress the brake pedal several times slowly. If the pedal goes down farther the first time but gradually rises after the second or third depression, the booster is airtight.
4. Depress the brake pedal while the engine is running, then stop the engine with the pedal depressed. If there is no change in the pedal reserve travel after holding the pedal for 30 seconds, the booster is airtight.
Hydraulic booster
5. Turn the engine off, then depress the brake pedal several times to deplete the pressure in the accumulator.
6. Push down on the brake pedal, exerting approximately 40 pounds of force, then start
the engine. If the booster is working properly, the brake pedal will sink toward the floor then rise back up against your foot.
7. If the booster does not work as described, check the fluid level in the power steering fluid reservoir, adding as necessary. Also check the hoses from the power steering pump to the booster for kinks. If everything checks out OK, the booster or power steering pump is defective. Have the power steering pump output pressure checked. If the pump is developing sufficient pressure, replace the booster.
Removal
8. Disconnect the cable from the negative battery terminal.
9. Depress the brake pedal several times to deplete the pressure in the accumulator (hydraulic booster) or a few times to remove vacuum (vacuum booster).
10. If you’re working on a model with a vacuum booster, detach the vacuum hose from the booster (see illustration).
10.10 Pull the vacuum hose fitting straight out of the grommet in the booster

11. If you’re working on a model with a hydraulic booster, detach the pressure and return lines from the booster. Cap the lines to prevent fluid leakage.
12. Remove the master cylinder without detaching the brake lines. Pull it forward and position it aside. Be careful not to bend or kink the brake lines.
13. Disconnect any electrical connectors from the components mounted to the booster, as equipped.
14. Remove the retaining nut (see illustration) and slip the pushrod off the large pin on the brake pedal arm (or assembly on adjustable pedals).
10.14 Remove the retaining bolt and slide the booster pushrod off of the brake pedal assembly

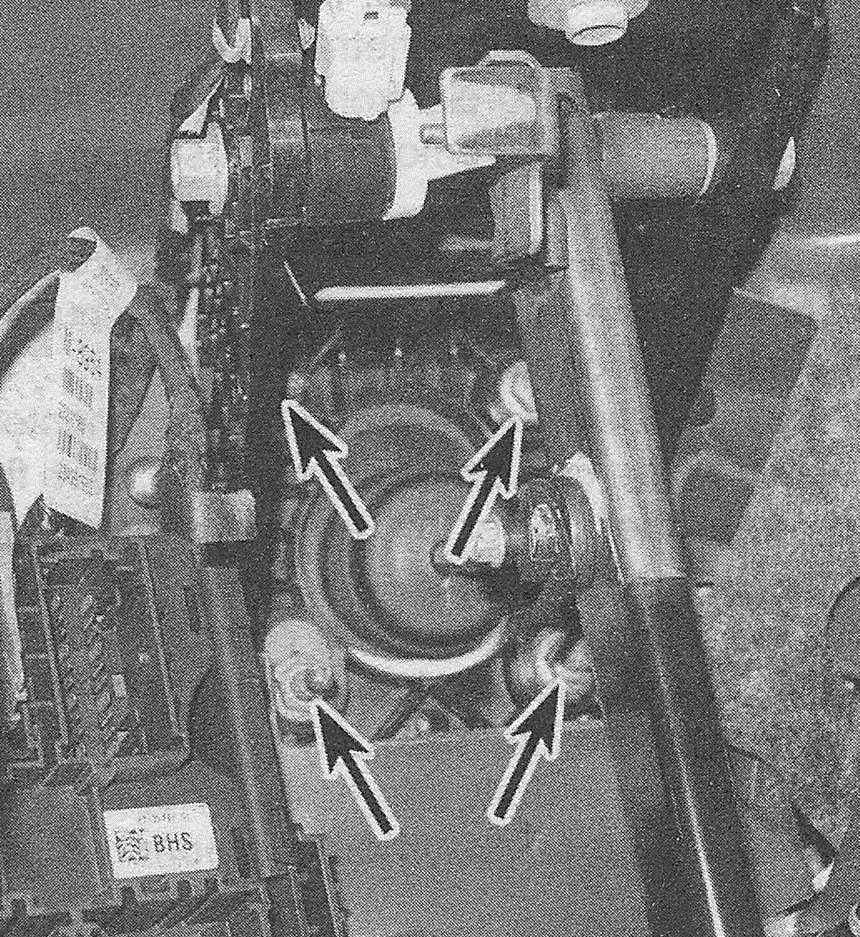
15. Remove the four nuts holding the brake booster to the firewall (see illustration).
10.15 Remove the booster mounting nuts ( not all nuts are visible in this photo — vicinity given)

16. Slide the booster straight out from the firewall until the studs clear the holes and pull the booster and gasket from the engine compartment.
Installation
17. Installation is the reverse of removal. Be sure to use a new gasket, and tighten the booster mounting nuts and the master cylinder mounting nuts to the torque values listed in this Chapter’s Specifications.
18. If you’re working on a model with a hydraulic booster, bleed the power steering system as described in Chapter Suspension and steering. Check the power steering fluid level and add some, if necessary, to bring it up to the appropriate level.