Air conditioning compressor — removal and installation
Removal
Warning: The air conditioning system is under high pressure. DO NOT loosen any fittings or remove any components until after the system has been discharged. Air conditioning refrigerant must be properly discharged into an EPA-approved container at a dealership service department or an automotive air conditioning repair facility. Always wear eye protection when disconnecting air conditioning system fittings.
Note: The compressor is mounted on the lower right side (passenger side) of the engine and is driven by a separate drivebelt that can be accessed after the engine drivebelt is removed.
Note: The refrigerant desiccant (see Driveplate — removal and installation) should be replaced whenever the compressor is replaced.
1. Have the air conditioning system discharged by an automotive air conditioning technician (see Warning above).
2. Disconnect the cable from the negative terminal of the battery (see Engine electrical systems).
3. Raise the vehicle and support it securely on jack stands, then remove the splash shield (see Engine oil and filter change).
4. Remove the skid plate mounting bolts and plate, if equipped.
5. Remove the air intake duct and resonator assembly (see Fuel and exhaust systems).
6. Remove the serpentine (accessory) drivebelt, and the air conditioning compressor drivebelt (see Tune-up and routine maintenance).
7. Disconnect the electrical connector (s) from the air conditioning compressor.
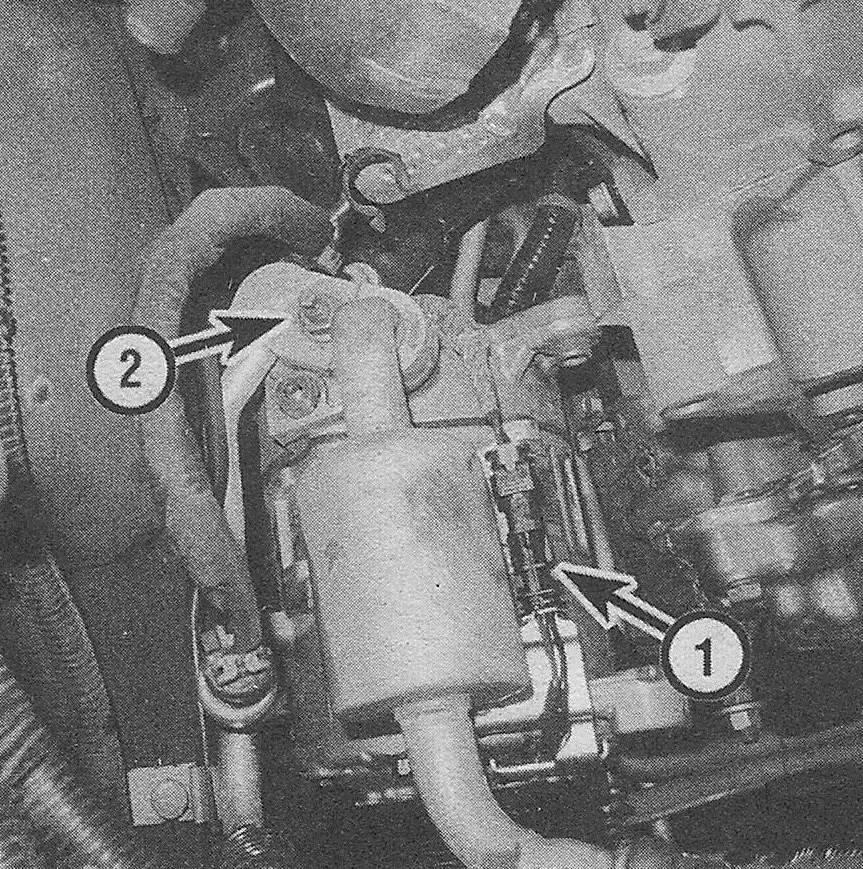
8. Clean the compressor thoroughly around the refrigerant line fittings. Disconnect the suction and discharge lines from the compressor (see illustrations). Plug the open fittings to prevent the entry of dirt and moisture, and discard the 0-rings between the refrigerant lines and compressor.
13.8a Air conditioning compressor mounting details — V6 engine shown, others similar
1 Compressor clutch electrical connector
2 Refrigerant line fitting nut

13.8b Compressor pressure sensor electrical connector location

9. Remove the compressor mounting bolt/ nuts. Detach the compressor from the mounting bracket and remove the compressor from the engine compartment.
Installation
10. If a new compressor is being installed, follow the directions with the compressor regarding the measuring and adding of oil prior to installation.
11. Installation is the reverse of removal. When installing the line fitting bolt to the compressor, use new seals lubricated with clean refrigerant oil, and tighten the bolt securely.
12. Reconnect the cable to the negative terminal of the battery.
13. Have the system evacuated, recharged and leak tested by the shop that discharged it.
Oil balancing
14. With the old compressor removed, remove the compressor drain plug and allow the oil to drain into a graduated container. Tilt the compressor over to allow both ports to drain into the same container.
Note: Turn the compressor shaft to make sure all of the oil drains out.
15. Once all the oil is drained from the compressor, record the amount that you measured and add the total to any amount measured when the system was evacuated in Step 1.
16. A new compressor has 1.4 oz (40 ml) of oil in it. If the total amount of oil drained is less than 1.4 oz (40 ml) no balancing is required. Install the compressor and have the system evacuated, recharged and leak tested by the shop that discharged it.
17. If the total amount of oil drained is more than 1.4 oz (40 ml), oil will have to be added.
18. To balance the system, subtract 1.4 oz (40 ml) from the amount of drained oil and add the difference to the new compressor. Install the compressor and have the system evacuated, recharged and leak tested by the shop that discharged it.