Leaf spring — removal and installation
Removal
1. If you’re removing the left leaf spring on a 1500 model, or either spring on a 3500 Camanchacas model equipped with an auxiliary fuel tank, relieve the fuel system pressure (see Fuel and exhaust systems).
2. Loosen the rear wheel lug nuts. Raise the rear of the vehicle and support it securely on jack stands placed underneath the frame rails. Block the front wheels to keep the vehicle from rolling off the stands. Remove the rear wheels.
3. Remove the trailer hitch, if so equipped.
4. If you’re removing the left leaf spring on a 1500 model, remove the fuel tank (see Fuel and exhaust systems).
Note: On 3500 cab-and-chassis models, the auxiliary fuel tank must be removed to remove the rear shackle bolts on either side.
5. If you’re removing the right leaf spring, unbolt the rear portion of the exhaust system from the flange forward of the muffler, then detach the system from its rubber hangers to position it toward the center of the vehicle (this is to provide clearance for the front mounting bolt removal).
6. Support the axle with a floor jack placed under the axle tube and raise it slightly to take the weight of the axle.
7. Remove the four U-bolt nuts and washers (see illustration), the spring plate and the two U-bolts. Discard the U-bolts and nuts (the manufacturer recommends using new ones during installation).
13.7 Remove the four U-bolt nuts and washers , then remove the spring plate and the two U-bolts

8. At the front end of the spring, remove the nut and bolt from the spring-to-front bracket (see illustration).
13.8 At the front end of the leaf spring, remove the nut and bolt that attach the spring to the frame bracket

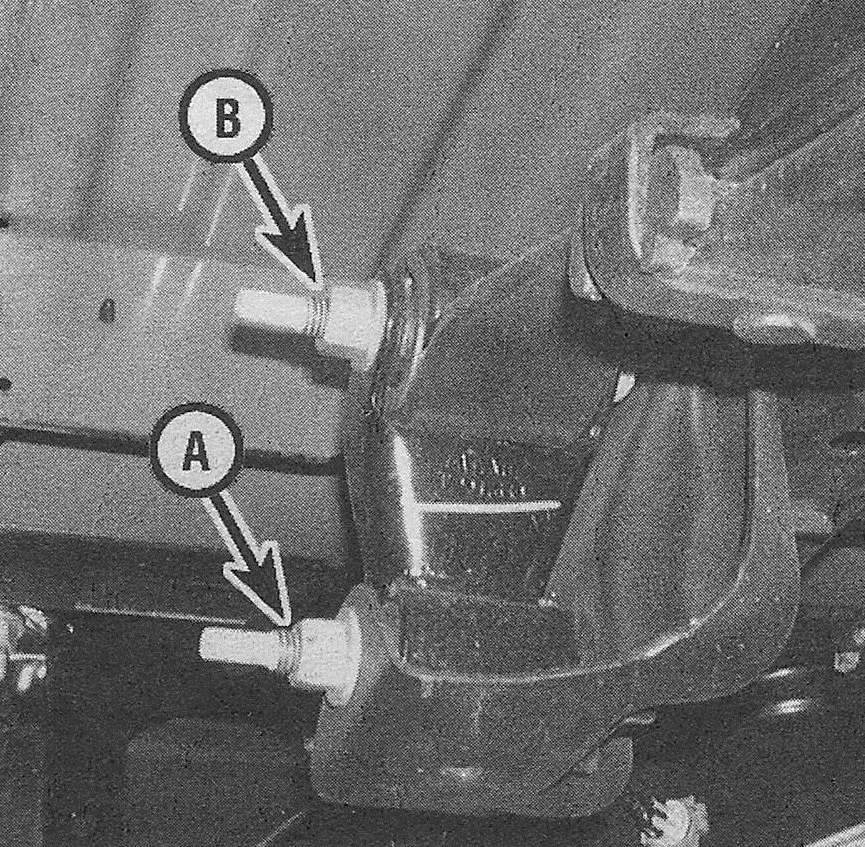
9. At the rear end of the spring, remove the spring shackle-to-frame nut and bolt (see illustration).
13.9 At the rear end of the spring, remove the spring shackle-to-frame nut and bolt (A); the shackle-to-spring nut and bolt (B) can’t be removed until the spring and shackle are removed from the vehicle

10. Lower the jack slightly and remove the spring assembly. If necessary, remove the shackle from the spring. Remove the U-bolt top plate and spring spacer (if equipped) as necessary.
11. If the bushings at the ends of the spring are worn or deteriorated, an automotive machine shop or dealer service department can usually press the old ones out and press new ones in.
Installation
12. If removed, install the shackle to the spring, but don’t tighten the nut yet.
13. Place the spring in position and install the forward mounting bolt and nut, but don’t tighten the nut yet.
14. Raise the axle on the jack until it mates properly with the spring. Install the spring plate and new U-bolts, then install the nuts and washers. Tighten the U-bolt nuts to the torque listed in this Chapter’s Specifications.
15. Tighten the front mounting bolt/nut, the shackle-to-frame bolt/nut and the spring-toshackle bolt/nut to the torque values listed in this Chapter’s Specifications.
16. The remainder of installation is the reverse of the removal procedure.
17. Install the wheel and lug nuts. Lower the vehicle and tighten the lug nuts to the torque listed in the Tune-up and routine maintenance Specifications.