Oil pump — removal, inspection and installation
Removal
1. Remove the timing chain cover (see Timing chain and sprockets — removal, inspection and installation) and, on 6.0L models, the oil pan (see Oil pan — removal and installation).
2. On 6.0L models, remove the oil pump pick-up tube mounting nuts and bolts and lower the pick-up tube and screen assembly from the vehicle (see illustration).
15.2 Remove the bolt securing the oil pick-up tube to the oil pump and remove the pick-up tube from the engine — 6.0L models

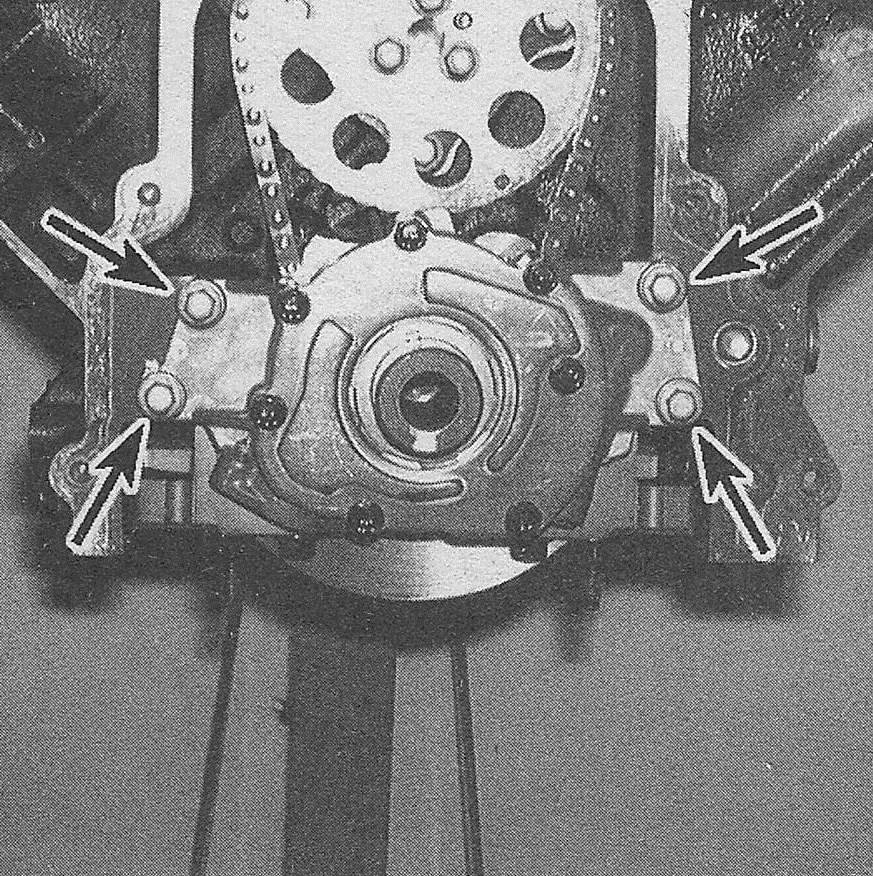
3. On 6.0L models, remove the oil pump retaining bolts and slide the pump off the end of the crankshaft (see illustration). On 5.3L and 6.2L models, install special tool EN-51257 to the engine block, by placing the one piece of the tool against the timing chain tensioner and the other piece against the edge of the oil pump body then tighten the mounting bolts securely.
15.3 Oil pump mounting bolts

Caution: On 5.3L and 6.2L models, if the oil pump is being removed and not replaced, special tool EN-51267 oil pump alignment tool must be installed to the engine block and against the pump before the oil pump is removed and remain in place until the pump is reinstalled. If the alignment tool is not installed prior to removal a new oil pump must be installed.
Inspection
4. Remove the oil pump cover and withdraw the rotors from the pump body (see illustration). Clean the components with solvent, dry them thoroughly and inspect for any obvious damage. Also check the bolt holes for damaged threads and the splined surfaces on the crankshaft sprocket for any apparent damage. If any of the components are scored, scratched or worn, replace the entire oil pump assembly. There are no serviceable parts currently available.
15.4 Oil pump cover-to-oil pump housing mounting bolts

Installation
5. Prime the pump by pouring clean engine oil into the pick-up tube hole, while turning the pump by hand.
6. Position the oil pump over the end of the crankshaft and align the teeth on the crankshaft sprocket with the teeth on the oil pump drive gear. Making sure the pump is fully seated against the block.
7. On 5.3L and 6.2L models, push the pump body upwards so that the pump body contacts the tool, then tighten the bolts. Constant contact between the oil pump body and the oil pump alignment tool must be maintained; there can be no gap between the oil pump housing and the tool. If there is a gap, loosen the oil pump bolts and push the pump against the tool and tighten the pump bolts again.
8. Install the oil pump mounting bolts and tighten them to the torque listed in this Chapter’s Specifications.
9. Install a new 0-ring on the oil pump pick-up tube, then fasten it to the oil pump and the engine block main studs (see illustration).
15.9 Always install a new 0-ring on the oil pump pick up tube

Caution: Be absolutely certain that the pickup tube-to-oil pump bolts are properly tightened so that no air can be sucked into the oiling system at this connection.
10. Install and align the timing chain cover (see Timing chain and sprockets — removal, inspection and installation), then install the oil pan (see Oil pan — removal and installation) on 6.01_ models.
11. The remainder of installation is the reverse of removal.
12. Add oil and coolant as necessary. Run the engine and check for oil and coolant leaks.