Timing chain and sprockets — removal and installation
Warning: Wait until the engine is completely cool before beginning this procedure.
Caution: The timing system is complex, and severe engine damage will occur if you make any mistakes. Do not attempt this procedure unless you are highly experienced with this type of repair. If you are at all unsure of your abilities, be sure to consult an expert. Double-check all your work and be sure everything is correct before you attempt to start the engine.
Removal
1. Disconnect the cable from the negative terminal of the battery (see Engine electrical systems). Drain the cooling system (see Tune-up and routine maintenance).
2. Remove the drivebelts (see Tune-up and routine maintenance).
3. Remove the cooling fan and coolant manifold (see Cooling, heating and air conditioning systems).
4. Remove the crankshaft balancer (see Crankshaft balancer — removal and installation).
5. Remove the vacuum pump (see Brakes).
6. Remove the air conditioning compressor mounting bolts, then reposition the compressor and secure it out of the way, without disconnecting the compressor lines.
7. Remove the oil pan (see Oil pan — removal and installation) and the oil pump (see Oil pump — removal, inspection and installation).
8. Remove the starter (see Engine electrical systems).
9. Position the number one piston at TDC on the compression stroke (see Top Dead Center (TDC) for number one piston — locating).
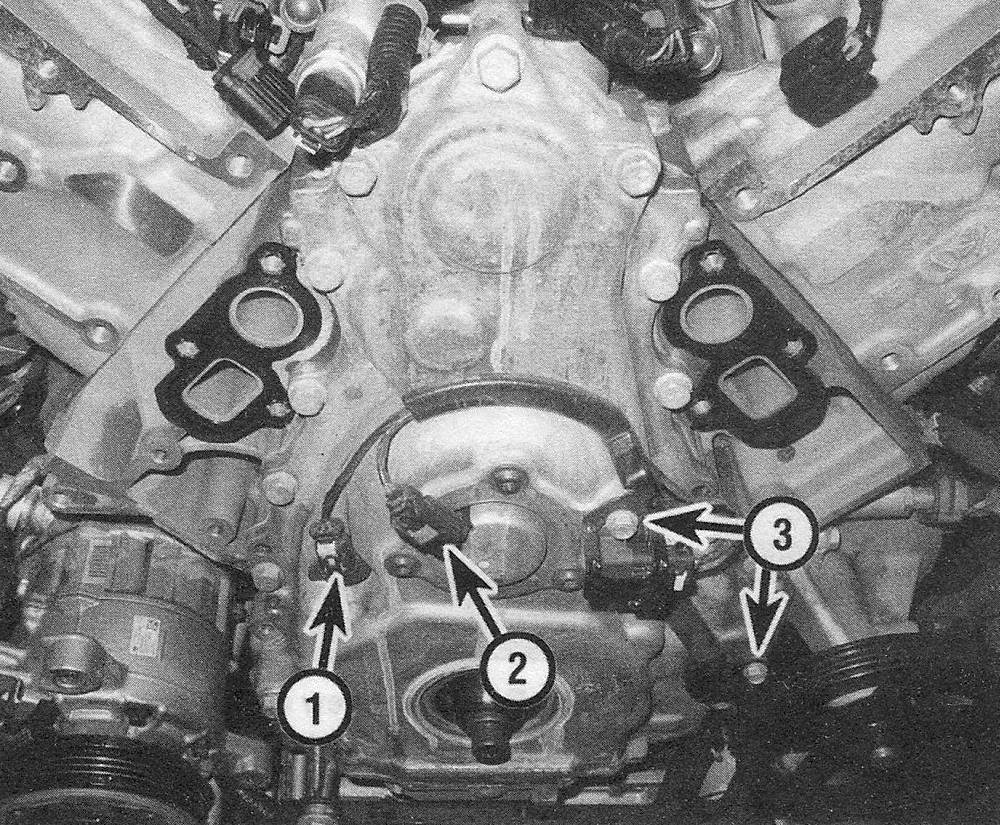
10. Disconnect the electrical connectors to the camshaft position sensor and camshaft position actuator magnet, then remove the sensor bolts and the bolts retaining the wiring harness to the front cover (see illustration).
12.10 Disconnect the electrical connectors to the camshaft position sensor (1) and the camshaft position actuator magnet (2), then remove the wiring harness-to-cover bolts (3)

11. Remove the oil pan (see Oil pan — removal and installation).
12. Remove the cover bolts and separate the timing chain cover from the block. It may be stuck — if so, use a putty knife or screwdriver to break the RTV gasket seal.
Caution: The timing chain cover bolts are different lengths and sizes; be sure to mark them and keep them in order. They must be installed in their original locations.
13. Remove the balance shaft chain, tensioner and sprocket (see Balance shaft, chain and sprockets — removal and installation).
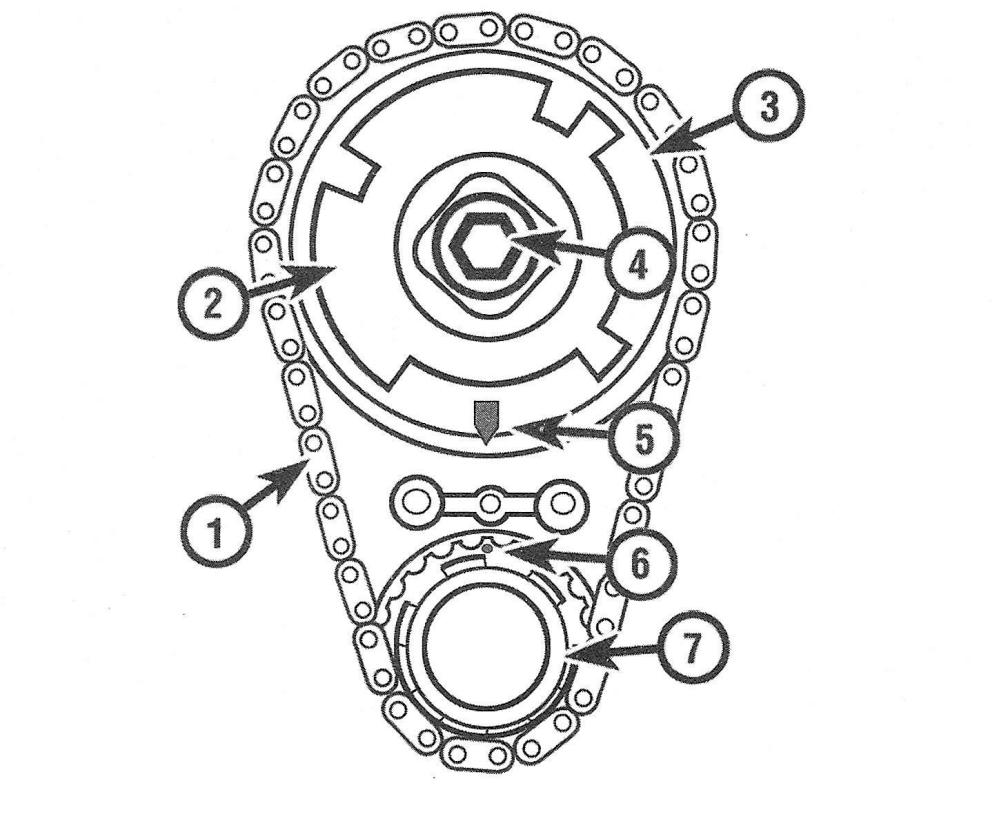
14. If the timing marks aren’t perfectly aligned, screw the crankshaft balancer bolt into the end of the crankshaft and rotate the crankshaft as necessary until the timing marks are aligned at the 12 o’clock and 6 o’clock positions (see illustration).
12.14 Timing chain alignment marks — when properly aligned, the crankshaft gear should be in the 12 o’clock position, the camshaft gear should be in the 6 o’clock position and the number one piston should be at TDC
1 Timing chain
2 Reductor wheel
3 Camshaft/actuator sprocket
4 Camshaft position actuator solenoid valve
5 Camshaft sprocket timing mark (6 o’clock position)
6 Crankshaft sprocket timing mark (12 o’clock position)
7 Crankshaft sprocket

Caution: Once the timing marks are aligned and the timing chain has been removed, DO NOT turn the camshaft or the crankshaft until the chain has been reinstalled!
15. Remove the solenoid valve from the center of the upper sprocket assembly and discard it (see illustration). It must be replaced with a new one.
12.15 Camshaft position actuator system components — the «bolt» is the solenoid valve (it must be replaced with a new one whenever it’s removed); don’t try to disassemble the actuator mechanism

16. Loosen the actuator from the front of the camshaft by putting your fingers around the rear of the chain and sprocket while pulling it off (see illustration).
12.16 Place your fingers as shown when pulling the actuator from the end of the camshaft — don’t pull on the reductor ring as it could pop apart and be destroyed

Warning: Don’t grasp the reductor wheel or any other parts of the assembly. The actuator could pop apart, injure you and become damaged.
17. Remove the actuator assembly along with the chain, then separate the chain.
Warning: Do not push or pull on the reductor wheel on the camshaft position actuator/ sprocket at any time. The reductor wheel is attached to the actuator by three small roll pins. If you push or pull on the reductor it may separate from the front of the actuator. The actuator has a return spring that is under very high tension. If the reductor wheel is separate from the actuator, the return spring can cause it to spin, which can cause serious personal injury.
Caution: Do not turn the crankshaft or the camshaft while the chain is off. Damage to the pistons and/or the valves could result.
18. Tie the actuator assembly together for safety (see illustration).
12.18 Secure the actuator with a wire tie or something similar to ensure that it doesn’t come apart

19. Remove the timing chain tensioner and inspect it for wear and damage.
20. Also inspect the camshaft and crankshaft sprockets for wear and damage.
21. If replacement of the timing chain is necessary, remove the sprocket from the crankshaft with a two- or three-jaw puller, but be careful not to damage the threads in the end of the crankshaft (see illustration).
12.21 The sprocket on the crankshaft can be removed with a two- or three-jaw puller

Installation
Caution: Timing chains must be replaced as a set with the camshaft and crankshaft sprockets. Never put a new chain on old sprockets.
22. Use a gasket scraper to remove all traces of old RTV gasket material and sealant from the cover and engine block.
23. Align the crankshaft sprocket with the Woodruff key and press the sprocket onto the crankshaft (if removed) with the vibration damper bolt, a large socket and some washers or tap it gently into place until it is completely seated.
Caution: If resistance is encountered, do not hammer the sprocket onto the crankshaft. It may eventually move onto the shaft, but it may be cracked in the process and fail later, causing extensive engine damage.
24. Loop the new chain over the camshaft sprocket, then turn the sprocket until the timing mark is at the bottom (if you’re working on an engine with the camshaft position actuator system, you’ll be installing the actuator/ sprocket assembly rather than the sprocket). Mesh the chain with the crankshaft sprocket and position the camshaft sprocket on the end of the camshaft. If necessary, turn the camshaft so the dowel in the camshaft fits into the hole in the sprocket with the timing mark in the 6 o’clock position. When the chain is installed, the timing marks MUST align as shown in illustration 12.14.
Caution: When installing the camshaft sprocket/actuator, be careful not to push the camshaft back into the engine block.
25. Lay a straightedge across the front of the block and verify that the timing chain does not protrude in front of the face of the engine block.
26. Tighten the NEW camshaft position actuator valve (sprocket bolt) to the torque listed in this Chapter’s Specifications.
27. Compress the timing chain tensioner and temporarily insert a pin in the hole to secure it in the retracted position.
28. Install the tensioner and tighten the bolts to the torque listed in this Chapter’s Specifications. Remove the pin to allow the tensioner to extend.
29. Install the balance shaft tensioner, chain and sprocket (see Balance shaft, chain and sprockets — removal and installation).
Caution: Carefully and slowly rotate the crankshaft by hand through at least two full revolutions (use a socket and breaker bar on the crankshaft pulley center bolt). If you feel any resistance, STOP! There is something wrong — most likely valves are contacting the pistons. You must find the problem before proceeding.
30. Install the oil pump (see Oil pump — removal, inspection and installation).
31. Clean all sealing areas of the timing chain cover and remove all traces of old RTV sealant. Clean the area with brake system cleaner to remove oily residue. Remove the crankshaft oil seal and purchase a new one.
32. Apply a 0.118-inch (3 mm) bead of RTV sealant to the sealing surfaces of the timing cover and 0.197-inch (5 mm) bead to the bottom inch of the cover and the flats on the upper sides of the cover.
33. Install the timing chain cover on the engine loosely, making sure the mounting bolts are in their original locations. Tighten the bolts, in sequence (see illustration) to the torque listed in this Chapter’s Specifications.
12.33 Front cover bolt tightening sequence

34. Install a new crankshaft oil seal (see Crankshaft front oil seal — removal and installation).
35. The remainder of installation is the reverse of removal.
36. Refill the cooling system and engine oil, and replace the engine oil filter (see Tune-up and routine maintenance). Run the engine and check for oil and coolant leaks.